Transcripts
A transcript is a written record of everything said in an interview. LetsFindWhy creates one automatically for every recording. You don’t order it, run software, or send files anywhere. Record a session (or upload an existing file) and the transcript appears next to the video.
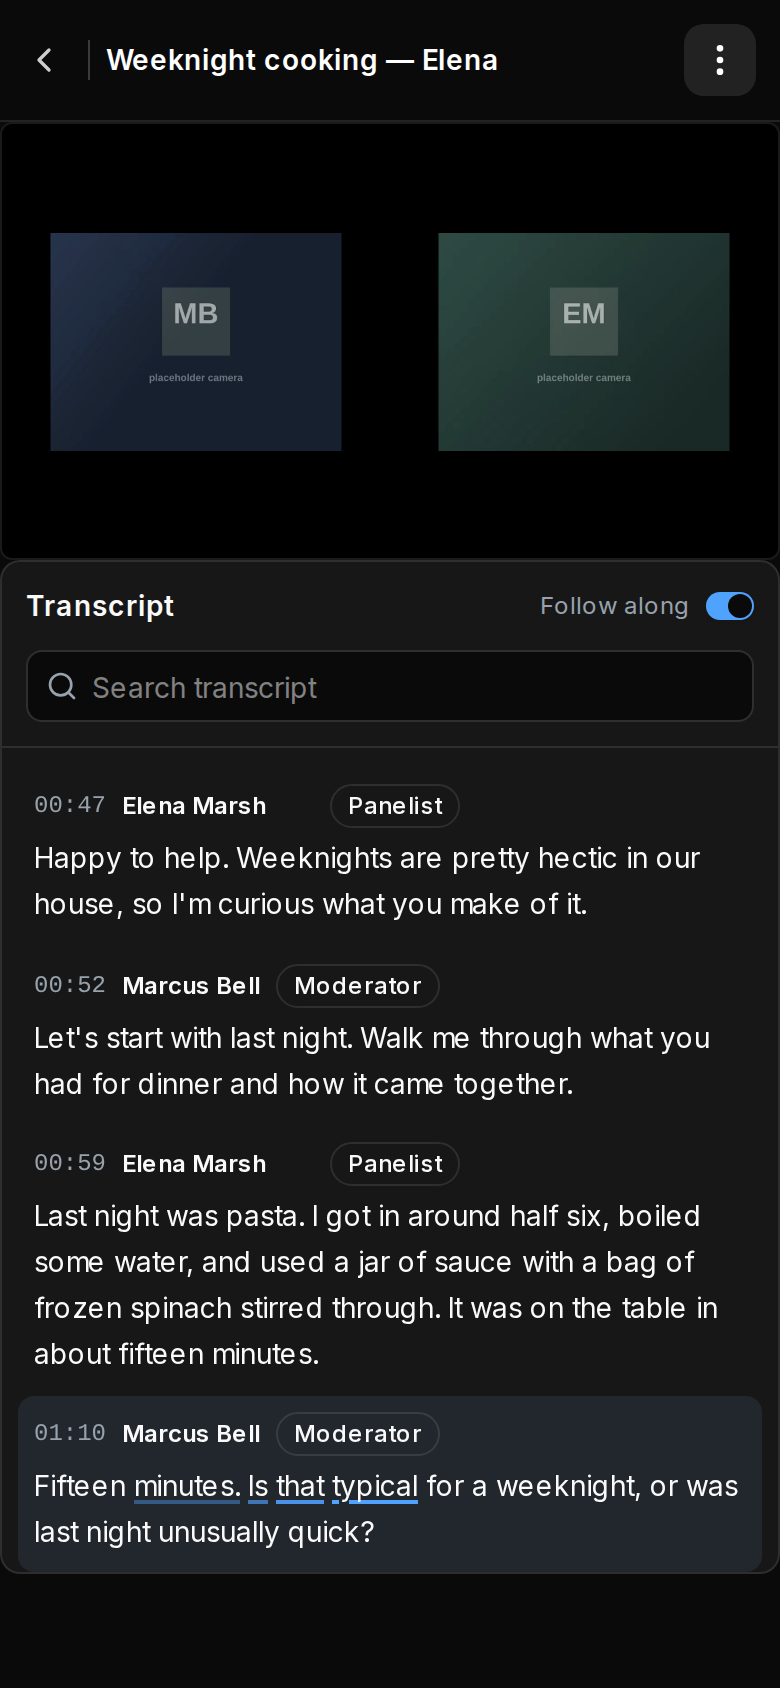
Every line shows who spoke, their role, and a timestamp that matches the video exactly. Click a line’s timestamp to jump the video to that moment, or search for a word to find every time it was said.
After recording ten interviews about your app’s onboarding, the last thing you want is to re-watch hours of video. Search each transcript for “setup” and jump straight to every mention.
There’s also live transcription during a session: you and your observers (teammates who watch without being seen) can read the conversation as text while it happens, translated into your own language.
How transcripts work: live transcription and finished transcripts
There are two kinds of transcript, and they’re independent of each other:
- Live transcription: a running text feed inside the meeting, on the sidebar’s Transcript tab. Only moderators and observers can use it; panelists never see the tab. It’s for following the session in the moment and is never saved.
- Finished transcripts: created automatically for every finalized recording, including uploaded audio and video, and shown on the recording’s playback page. There’s no button to press and no way to miss one.
Recorded sessions are transcribed one participant at a time, so the finished transcript carries real names and role badges (Moderator, Panelist, Observer, and an AI badge for the AI moderator) with no guessing about who said what. Uploaded files are instead split by voice into “Speaker 1”, “Speaker 2”, and so on, which you can rename afterwards.
How to start live transcription during a session
Anyone in the meeting as a moderator or observer can transcribe live. Each viewer gets their own private feed.
- Join the meeting and select the Transcript tab in the sidebar.
- Click Start transcription. The button shows Starting… for a few seconds while transcription spins up.
- Read along: the panel header shows Listening…, each line starts with the speaker’s name, and text still being spoken appears in italics until the line finalizes.
- Read translations beneath any line spoken in a language other than your own. They appear once the line finalizes.
- Click Stop when you’re done. Your feed is discarded; other viewers keep theirs.
Live transcription hears moderators, panelists, and the AI moderator. Observers are never transcribed. It supports sessions held in English, Spanish, Portuguese, French, German, and Italian; for other session languages the button is disabled with “Live transcription isn’t available for this session’s language yet.” Any interface language works as a translation target.
How to read a transcript alongside the recording
Finished transcripts are available to the session’s moderators and to any organization member with access to the project.
- Open Recordings in the project sidebar.
- Click Play on a recording. The playback page opens with the Transcript panel next to the video (below it on a phone).
- Wait if it’s still processing. The panel reads “The transcript is being generated. This page will update automatically when it’s ready.” and refreshes itself.
- Leave Follow along switched on to auto-scroll with playback. The word currently being spoken is underlined on the active line. Switch it off to read elsewhere without playback pulling you back.
- Click a line’s timestamp to jump the video to that moment. The lines themselves are ordinary text, so you can select across them and copy a quote out.
- Type in Search transcript to highlight every occurrence, then step through matches with the Previous match and Next match arrows (Enter and Shift+Enter also work).
How to rename a speaker in a transcript
Moderators can rename speakers who joined as guests, and the “Speaker 1”-style voices from uploads. People with a LetsFindWhy account name themselves, and the AI moderator can’t be renamed.
- Find any line by that speaker on the recording’s playback page.
- Hover over the line and click the pencil icon (Rename speaker) next to the name.
- Type the new name (1–60 characters) and press Enter or click away to save; Escape cancels.
- Check the result: the new name applies instantly to every line by that speaker across the whole transcript.
How to get a transcript for uploaded audio and video
Interviews recorded elsewhere (old studies, phone recordings, sessions from another tool) get the same searchable transcript once you upload them.
- On the Recordings page, click Upload media or drag files onto the page.
- Wait for the upload to finish. The card shows an Uploaded badge and transcription starts automatically.
- Open the recording once the transcript is ready. Speakers are separated by voice and labeled “Speaker 1”, “Speaker 2”, and so on.
- Rename them to real names with Rename speaker.
Comparing responses across respondents
A transcript tells you “what happened in session 7”. Most of the time the question you actually have is “what did everybody say about pricing?”: one question from your discussion guide, every respondent’s response to it, read down a page. That is the Responses page, in the sidebar under Recordings.
- Open Responses in the project sidebar. It lists each discussion guide your sessions have responses on; open one to read them.
- Pick the question you want to read from the dropdown at the top, or step through the guide with the arrows beside it. Every question in the guide is listed with how many sessions responded to it, so a question nobody was asked stays visible.
- That question fills the page, with one card per respondent who responded. A group session gives you one card per person who spoke, not one for the room.
- Click a card to watch that response. It opens over the page, so you can play six respondents in a row without losing your place.
- The page reads ten sessions at a time. Use Earlier / Later sessions at the bottom to move to the next ten. Changing the question keeps the same sessions, so you can read two questions over the same people.
Under every question is a line naming the sessions with no response, and why: not asked, nobody responded, still transcribing. This is the part Ask AI cannot give you. A chat reply quotes what it found, and cannot tell you that respondent 9 was never asked the question at all.
If a moderator reworded a question during a session, the card shows their wording under the question’s heading. Where a response starts and ends is worked out from the question marker, so treat it as a good pointer rather than an exact boundary. The video is always one click away.
You can also get there from a recording: every question marker in the transcript has a small compare icon that opens the Responses page at that same guide question.
Rating and choice questions
A rating or choice question in your guide gets a chart above its cards, counting every answer across every session in the project. Each card shows that person’s answer next to what they said about it, and how the answer was given: tapped on screen, said aloud to the AI moderator, or entered by a moderator.
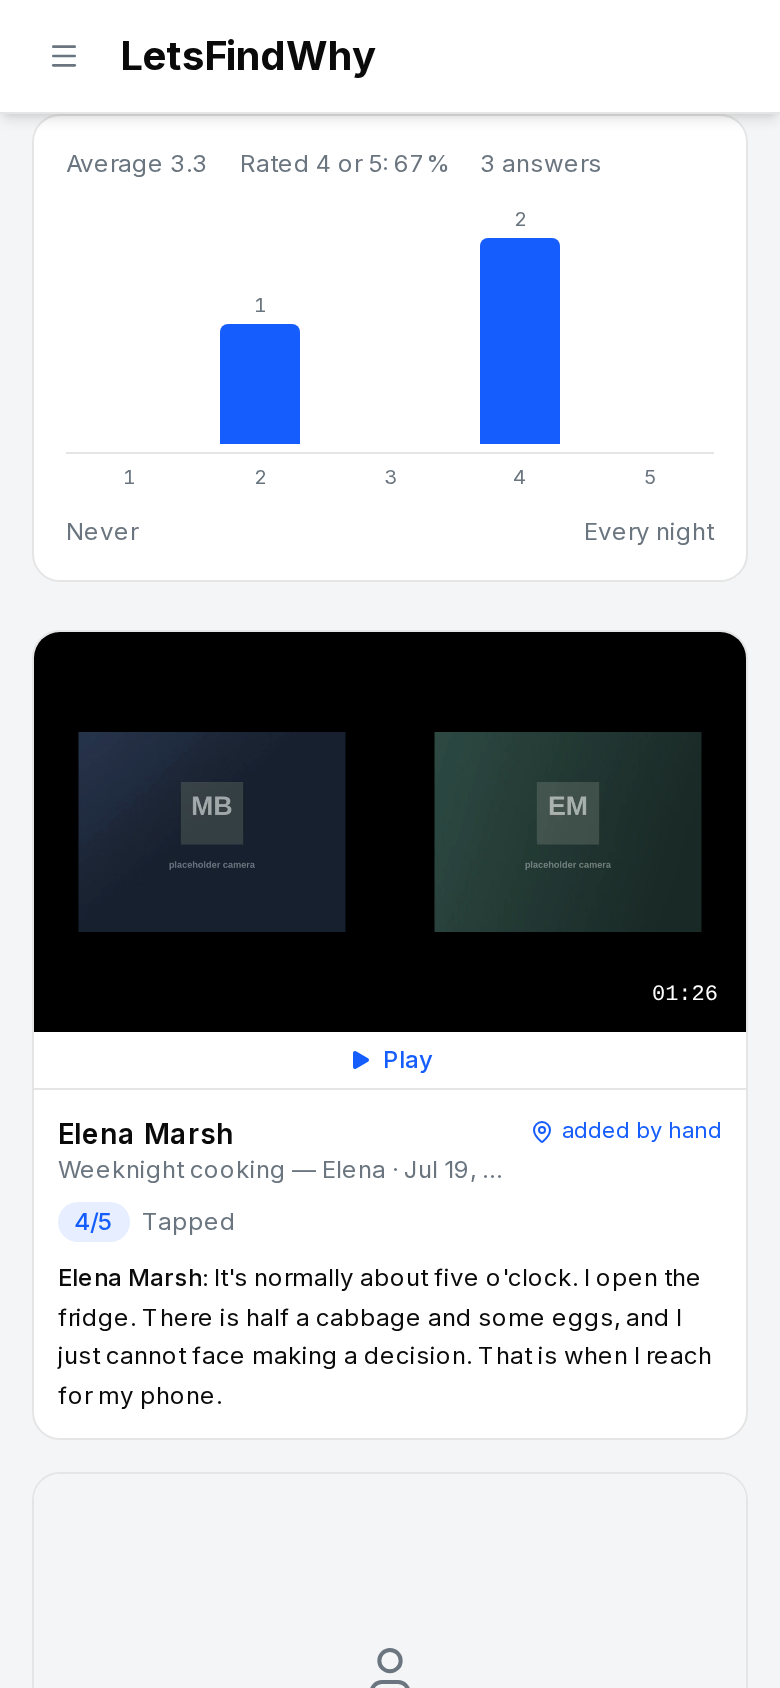
- Click a bar to see only the people who gave that answer. Every session is searched, not just the ten on screen, so the cards add up to the bar. Click the bar again, or Show everyone, to go back.
- Someone who answered on screen and said nothing still gets a card, marked “Answered on screen, didn’t comment.” Every answer in the chart has a card.
- Use Compare groups to split the chart by another question: another rating or choice question in the same guide, or a question your respondents answered on the screener that recruited them or on a survey before or after their interview. You get one small chart per group, for example how teams of different sizes rated deploying a change.
- Click Export CSV for a spreadsheet with one row per respondent. Each rating or choice question gets a column for the answer and a “why” column holding that person’s own words from the recording, so the numbers and the reasons travel together. Questions removed from the guide since sessions answered them, and rating or choice questions added during a session, come after the guide’s own; an interview’s copy asked in a different answer format gets its own column next to the question’s. Each is labelled so you can tell them apart.
Tips for researchers
- Live transcription is built for the Backroom: each feed goes only to the viewer who started it, so an observer can read the session in their own language without panelists ever knowing someone is watching, or in what language.
- Treat the live transcript as a monitor, not a record: it keeps only the most recent 300 lines and is discarded on Stop or a page refresh. The finished transcript from the recording is the record.
- Session transcripts need no speaker clean-up: each participant’s audio is transcribed separately, so names and roles come straight from the room. Only uploads rely on voice separation.
- Timestamps are aligned to the played video, even when a session produced several recordings on one timeline, so a quote’s timestamp is a reliable pointer for clip-pulling.
- There’s no transcript export. The recording’s Download button downloads the video only. To pull a quote, select the lines in the panel and copy them.
- Deleting a recording permanently deletes its transcript with it. When your retention window removes a recording, it also takes the answers that recording contributed to the Responses page and the passages Ask AI can quote. This can’t be undone.